Some aspects of traditional Windows application (win32) deployment using Microsoft Endpoint Manager (Intune) can be frustratingly elusive. Understanding the execution environment and detection capabilities can help you find greater success with this tool. Note: In this context, win32 refers to native Windows applications–not 32-bit applications vs. 64-bit applications.
Deploying Software Packages
To prepare a win32 program for deployment with Endpoint Manager, you should copy the EXE or MSI installer to an empty directory, then open a terminal and navigate to that directory and run IntuneWinAppUtil:
IntuneWinAppUtil.exe -c . -s [INSTALLER] -o .Anything in the directory will be included in the resulting .intunewin file, so it is possible to include additional assets like an MSI transform file.
Install and Uninstall Commands
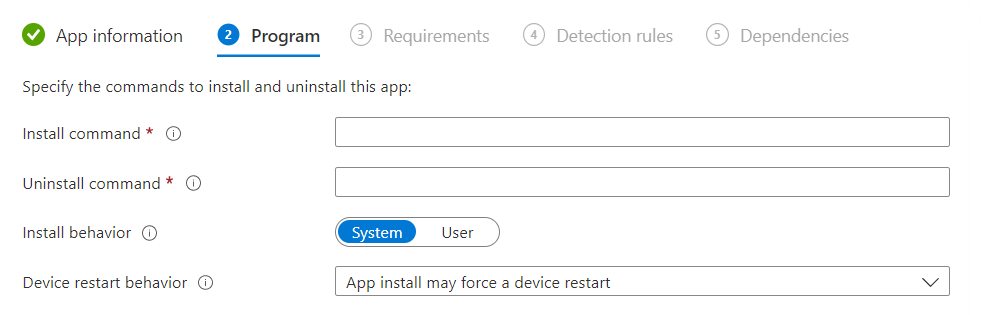
Your install and uninstall commands should run silently with no end-user interaction. On the target system, the Microsoft Intune Management Extension downloads and extracts the contents of the .intunewin file to a temporary directory and executes the command from a CMD shell within that location. In the simplest scenarios, you can manage your deployments with just these two command lines. However, when this does not meet your needs, you can use a wrapper script.
CMD Wrapper Scripts
Available command-line options vary greatly from one program to the next. For example, the gVim for Windows installer doesn’t have a command-line switch to prevent the creation of desktop icons. This sample wrapper script performs the silent installation and removes the desktop icons:
@ECHO OFF
REM This script silently installs gVim and removes the desktop icons it creates

gvim_8.2.4877_x64_signed.exe /S
del /Q "C:\Users\Public\Desktop\gVim 8.2.lnk"
del /Q "C:\Users\Public\Desktop\gVim Easy 8.2.lnk"
del /Q "C:\Users\Public\Desktop\gVim Read only 8.2.lnk"
To utilize this script:
- Place it in the directory with the gVim EXE and package both files together into an
.intunewinfile using the IntuneWinAppUtil process described above. - In Endpoint Manager, create a Win32 app deployment and upload the
.intunewinfile. The install command will beinstall-gvim.cmd.
When the Microsoft Intune Management Extension on the target system determines that the system is eligible for this package, it downloads and extracts the .intunewin package to a temporary folder and runs install-gvim.cmd in a CMD shell, resulting in a silent gVim installation with no desktop icons.
So far so good, right?
As your scripts become more complicated (environment variables) or if you want to use PowerShell instead, things become more nuanced. The important thing to know is that on the target system, the install and uninstall commands run in CMD in the 32-bit context which can impact the outcome. For example, in the 32-bit context, the %PROGRAMFILES% environment variable resolves to C:\Program Files (x86) while in the 64-bit context, it resolves to C:\Program Files. To verify that your install and uninstall commands will work, you should open the 32-bit CMD shell as Administrator for testing:
C:\Windows\SysWOW64\cmd.exeCMD 64-bit Wrapper Scripts
If you want your wrapper script to run in the 64-bit context, you can call your script using the sysnative CMD path as your install command (Note: You will not find a sysnative directory on your system; it is a special alias that the Windows File System Redirector provides for invoking 64-bit process from within the 32-bit context):
C:\Windows\sysnative\cmd.exe /c install-gvim.cmdPowerShell Wrapper Scripts
You can use PowerShell to create a wrapper script but as a friendly reminder, deployment will run in CMD in the 32-bit context so your install command must call powershell.exe. You might write an install command like this and think mission accomplished:
powershell.exe -File powershell-script.ps1However, since this is being called from within CMD in the 32-bit context, it invokes a 32-bit PowerShell where the environment (especially the Execution Policy) can differ from your expectations. You can address this by setting the execution policy in your install command:
powershell.exe -ExecutionPolicy RemoteSigned -File powershell-script.ps1But again, this invokes a 32-bit PowerShell environment which still might not meet your needs. If you need your scripts to run in a 64-bit PowerShell, you have a couple options.
Option 1: Use a 64-Bit CMD Shell to Call the 64-Bit PowerShell Executable
Create a CMD wrapper script that calls powershell.exe:
@ECHO off
powershell.exe -ExecutionPolicy Bypass -NoNewWindow -NonInteractive -NoProfile -File "powershell-script.ps1"
In Intune, the Install command would be C:\Windows\sysnative\cmd.exe /c powershell-wrapper.cmd. Using sysnative invokes CMD in the 64-bit context to run the CMD wrapper script which in turn calls powershell.exe, resulting in a 64-bit PowerShell environment. The CMD script and the PS1 script must be included in the .intunewin file along with the installer EXE or MSI.
Option 2: Detect the Process Bit-ness from within PowerShell
Use can use internal logic within your PowerShell script to determine if the session is 64-bit and re-launch when it is not:
Function Main {
    # Your script logic here
    Write-Host "This script was executed in a 64-bit PowerShell session."
}

# Determine if this is a 64-bit session
If ([System.Environment]::Is64BitProcess -eq $true) {
    # Process is 64-bit; call the Main function to proceed
    Main
} Else {
    # Process is not 64-bit; re-launch
    Invoke Expression -Command ((Join-Path -Path $Env:Windir -ChildPath 'Syssnative\WindowsPowerShell\v1.0\powershell.exe') + ' -Execution Policy Bypass -WindowStyle Hidden -File "' + $MyInvocation.InvocationName + '"')
}
In Intune, the Install command would be powershell.exe -ExecutionPolicy Bypass -NoNewWindow -NonInteractive -NoProfile -File "powershell-64-bit-script.ps1". Intune will run this command in CMD in the 32-bit context, resulting in a 32-bit PowerShell environment. The internal logic detects a 32-bit PowerShell process and re-launches itself using the 64-bit PowerShell executable.
Detecting Installed Software
Detecting MSI Installations
Detection is a no-brainer when the installer is an MSI; you can simply choose the MSI detection method, and Intune populates the detection details.
Detecting EXE Installations
When the installer is an EXE, you’ll need to the registry for help. Most applications create a subkey of the Uninstall key containing (among other things) a DisplayVersion that can be useful detection criteria. The Uninstall registry location is different for 32-bit applications vs. 64-bit applications.
| Bit-ness | Location |
|---|---|
| 64-bit | HKEY_LOCAL_MACHINE\SOFTWARE\Microsoft\Windows\CurrentVersion\Uninstall |
| 32-bit | HKEY_LOCAL_MACHINE\SOFTWARE\WOW6432Node\Microsoft\Windows\CurrentVersion\Uninstall |
Here we see the subkey created by the gVim installation in the 64-bit registry:
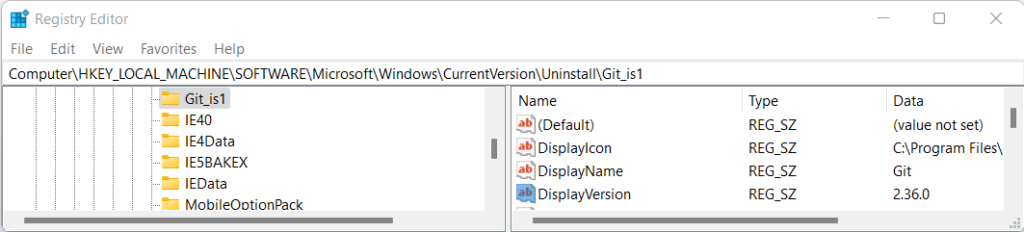
In Intune, we can use the registry detection method that examines the DisplayVersion value and determines if the data matches “2.36.0”. When Intune sees a match, it will report that the target system has successfully installed gVim.
More Information
For a more in-depth discussion on how Intune works, please see Summary of the Intune Management Extension by Jannik Reinhard.