I’m pleased to announce the availability of the OZO Meshtastic Time and Weather package.
What it does: This is a service for Linux that reads the current time from GPS, fetches local weather from the NOAA/NWS API, and broadcasts both on the local Meshtastic mesh on a schedule. It should work with any GPS radio that works with gpsd and any serial (USB) or SPI attached LoRa radio that works with meshtasticd. In the absence of a GPS signal (or radio), it can fall back to the system time and a user-configured fixed location.
What it does not do: Prepare the operating system, configure the daemons, or configure the radios.
This post demonstrates the full implementation of this service–from connecting the hardware, to installing the OS and configuring it to be self-maintaining, to implementing the prerequisite daemons, to configuring and testing the radios, to finally installing and configuring OZO Meshtastic Time and Weather and sending the first broadcast. Please see README.md before continuing.
Implementation Plan
- The time and weather should be broadcast twice daily at 6:00am and 8:00pm on the local Mestastic “Longfast” (public) channel.
- The operating system should be self-maintaining, so it will be configured to download and install updates througout the day, and (when needed) reboot at 2:00am; and it should clean up after itself, including removing unneeded package dependencies and kernels.
- The system should be secure but still accessible, so it should have a basic firewall that allows access over SSH.
- SSH aside, it will provide no network-accessible services, but will need internet access to retrieve weather data from NOAA, so the wireless interface will be configured for DHCP.
- Local system time will be used when GPS time is not available, so the operating system should use NTP to maintain an accurate clock.
Hardware
- Raspberry Pi Zero W v1.1. This device choice helps minimize the power requirements in support of the implementation plan. A Zero 2 W is another good choice.
- Waveshare L76K GPS HAT. The GNSS (GPS) radio is available on the UART.
- Seeed Studio XIAO nRF52840 & Wio-SX1262 Kit (Meshtastic documentation). This is a complete Meshtastic solution attached by USB, so this implementation will not need
meshtasticd.
Prepare the Raspberry Pi
Install Operating System
No need to reinvent the wheel when documentation like Getting started – Raspberry Pi Documentation exists. I used the Raspberry Pi Imager to install Raspberry Pi OS Lite (32-bit, based on Debian Trixie) to a 16GB microSD card. Using sudo raspi-config, I made the following configuration changes and rebooted:
- Localization Options > L1 Locale: en_US.UTF-8 UTF-8
- Localization Options > L2 Timezone: Americas/Denver
- Localization Options > L4 WLAN Country: US
- System Options > S1 Wireless LAN
- Interface Options > I1 SSH Enable/disable remote command line access using SSH: Yes
- Advanced Options > A1 Expand Filesystem Ensures that all of the SD card is available: Yes
Configure Automatic Updates
Set the following directives in /etc/apt/apt.conf.d/50unattended-upgrades to support the implemenation plan:
Unattended-Upgrade::Origins-Pattern {
    "origin=Raspbian,archive=stable";
    //"o=obs://build.opensuse.org/network:Meshtastic:beta/Raspbian_13,n=Raspbian_13";
};
Unattended-Upgrade::Remove-Unused-Kernel-Packages "true";
Unattended-Upgrade::Remove-Unused-Dependencies "false";
Unattended-Upgrade::Automatic-Reboot "true";
Unattended-Upgrade::Automatic-Reboot-WithUsers "true";
Unattended-Upgrade::Automatic-Reboot-Time "02:00";
After making the above configuration changes:
sudo systemctl enable unattended-upgrades
sudo dpkg-reconfigure --priority=low unattended-upgrades
Note: The "o=obs://build.opensuse.org/network:Meshtastic:beta/Raspbian_13,n=Raspbian_13"; origin (commented out in this example) is useful if you need meshtasticd on 32-bit Raspberry Pi OS (as will be the case if you are using an SPI-attached LoRa radio).
Configure Network Time
NTP is enabled by default on Raspberry Pi OS. We can verify this with systemctl and timedatectl:
sudo systemctl status systemd-timesyncd● systemd-timesyncd.service - Network Time Synchronization
Loaded: loaded (/usr/lib/systemd/system/systemd-timesyncd.service; enabled; preset: enabled)
Active: active (running) since Wed 2026-11-04 10:57:40 MST; 2h 20min ago
Invocation: 0bd1fa9175ac42b38de9e54c25ee55ba
Docs: man:systemd-timesyncd.service(8)
Main PID: 280 (systemd-timesyn)
Status: "Contacted time server 40.160.22.251:123 (2.debian.pool.ntp.org)."
Tasks: 2 (limit: 449)
CPU: 980ms
CGroup: /system.slice/systemd-timesyncd.service
└─280 /usr/lib/systemd/systemd-timesyncd
sudo timedatectl show-timesyncFallbackNTPServers=0.debian.pool.ntp.org 1.debian.pool.ntp.org 2.debian.pool.ntp.org 3.debian.pool.ntp.org
ServerName=2.debian.pool.ntp.org
ServerAddress=40.160.22.251
RootDistanceMaxUSec=5s
PollIntervalMinUSec=32s
PollIntervalMaxUSec=34min 8s
PollIntervalUSec=34min 8s
NTPMessage={ Leap=0, Version=4, Mode=4, Stratum=3, Precision=-26, RootDelay=18.234ms, RootDispersion=930us, Reference=19C15CF5, OriginateTimestamp=Wed 2026-11-04 13:15:28 MST, ReceiveTimestamp=Wed 2026-11-04 13:15:28 MST, TransmitTimestamp=Wed 2026-11-04 13:15:28 MST, DestinationTimestamp=Wed 2026-11-04 13:15:28 MST, Ignored=no, PacketCount=10, Jitter=11.302ms }
Frequency=-424535Install and Configure the Firewall
The following commands will install UFW and allow inbound SSH connections:
# Install UFW
sudo apt install ufw
# Allow SSH connectinons (TCP/22)
sudo ufw allow SSH
# Enable UFW
sudo ufw enable
After running the above commands, list the rules:
sudo ufw status

Status: active

To                         Action      From
--                         ------      ----
SSH                        ALLOW       Anywhere
SSH (v6)                   ALLOW       Anywhere (v6)
Install OZO Meshtastic Time and Weather
Download the latest release to your user home directory, then:
tar xfvz OZO-Meshtastic-Time-and-Weather-1.0.0.tar.gz
cd OZO-Meshtastic-Time-and-Weather-1.0.0
sudo ./install.sh
The install.sh script creates a basic /etc/ozo-meshtastic-tw/config.json configuration file, installs gpsd, and runs the included check_radios.py script to test the radios. These test will most likely fail since we have not yet customized config.json.
Configure and Test the GPS Radio
Enable the Serial (UART) Interface
Follow Raspberry Pi (Linux) | Meshtastic to enable the UART interface. Or, use sudo raspi-config and reboot:
- Interface Options > I6 Serial Port Enable/disable shell messages on the serial connection:
- Would you like a login shell to be accessible over serial? No
- Would you like the serial port hardware to be enabled? Yes
Configure GPSD
According to Raspberry Pi (Linux) | Meshtastic, on the Pi Zero W, the GPS radio will be on /dev/ttyS0, so we can configure /etc/default/gpsd as follows:
DEVICES="/dev/ttyS0"
GPSD_OPTIONS="-n"
Then we can enable and start gpsd:
systemctl enable --now gpsdTest GPS Reception
We can then use cgps on the command line to verify we are receiving GPS data. In this example we can see I’m getting a time and location fix (which I have obscured) as well as altitude:
┌───────────────────────────────────────────┐
│ Time         2026-11-04T19:26:48.000Z ( 0)│
│ Latitude          ##.######## X           │
│ Longitude         ##.######## X           │
│ Alt (HAE, MSL)    5281.574,   5339.922 ft │
| <snip>                                    |
└───────────────────────────────────────────┘
Configure and Test the LoRa Radio
This implementation uses a self-contained Meshtastic solution accessed by USB (serial), and will not need meshtasticd. See README.md if you have an SPI-attached radio.
Install Meshtastic Command Line
We will implement a Python venv to provide the meshtastic command:
# Sudo to root
sudo su -
# Create the venv
python3 -m venv ~/meshtastic-cli-venv
# Activate the venv
. ~/meshtastic-cli-venv/bin/activate
# Upgrade PIP
python3 -m pip install --upgrade pip
# Install the meshtastic CLI
pip install "meshtastic[cli]"
Keep this venv active for the following steps. My USB-attached radio appears as /dev/ttyACM0 so my meshtastic commands need --port /dev/ttyACM0. See README.md for clues on the path to your USB radio, or to determine how these steps are different if you have an SPI-attached radio.
Configure the Radio
Set the node’s region:
meshtastic --port /dev/ttyACM0 --set lora.region USSet the node’s displayed long and short names (the short name is up to four characters):
meshtastic --port /dev/ttyACM0 --set-owner "OZO MTW Downtown Denver"
meshtastic --port /dev/ttyACM0 --set-owner-short "OMDD"
Set the public primary channel at index 0 to the usual LongFast settings. LongFast is the channel name, default is the publicly known default key, and --ch-longfast selects the LONG_FAST modem preset:
meshtastic --port /dev/ttyACM0 --ch-set name LongFast --ch-index 0
meshtastic --port /dev/ttyACM0 --ch-set psk default --ch-index 0
meshtastic --port /dev/ttyACM0 --ch-longfast
[Optional] set the node role to CLIENT_MUTE so it will only transmit time and weather updates (and will not rebroadcast messages it receives):
meshtastic --host localhost --set device.role CLIENT_MUTEVerify all the settings. Note that this output contains your radio’s private key, so do not share this output publicly:
meshtastic --port /dev/ttyACM0 --infoBroadcast a Test Message
meshtastic --host localhost --sendtext "radio test" --ch-index 0Configure and Start ozo-meshtastic-tw
With the radios configured and working, we can configure and start the service. The changes from the defaults to /etc/ozo-meshtastic-tw for this implementation are:
{
  "meshtastic": {
    "connection": "serial",
    "serial_port": "/dev/ttyACM0",
  },
  "schedule": {
    "interval_minutes": 60,
    "times": ["06:00","20:00"],
    }
  },
  "time_zone": "America/Denver"
}
Then, we can enable and start the service
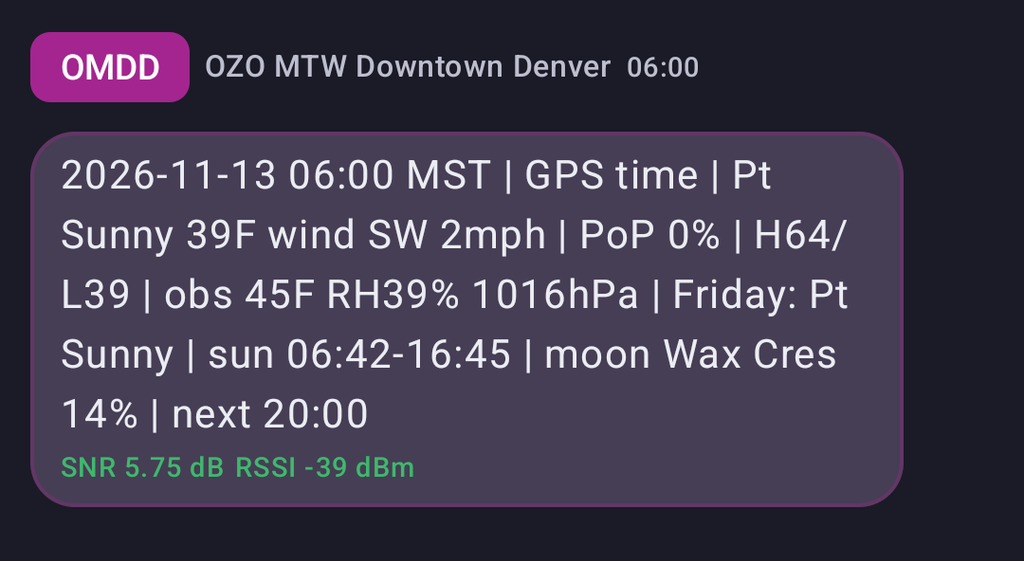
sudo systemctl enable --now ozo-meshtastic-twThe first public scheduled broadcast arrived on the Denver area mesh on 2026-Nov-13 at 06:00 Mountain as seen from the Meshtastic Android app connected to a second Meshtastic node:
Relevant Links
- OZO-Meshtastic-Time-and-Weather/README.md
- Releases · onezeroone-dev/OZO-Meshtastic-Time-and-Weather
- Waveshare L76K GPS HAT
- Seeed Studio XIAO nRF52840 & Wio-SX1262 Kit
- Seeed Wio-SX1262 Series | Meshtastic
- Automating Software Updates on Raspberry Pi – TheLinuxCode
- Step-by-Step Guide: Configuring a Firewall on Raspberry Pi – RaspberryTips
- Raspberry Pi (Linux) | Meshtastic